Your Complete Guide to Googlebook: Transitioning from Chromebook to Google's New Android-Powered Laptop
Introduction
If you've been following the latest tech leaks, you've likely heard about Google's upcoming laptop platform—the Googlebook. This new device is set to succeed the Chromebook, swapping Chrome OS for a fully Android experience designed specifically to leverage Google Gemini Intelligence. Unlike its predecessor, the Googlebook offers seamless native integration with your Android phone, tablet, or watch, and introduces a unique Glowbar—a dynamic light bar that reacts to what you're doing. Whether you're a long-time Chromebook user or new to the Google ecosystem, this guide will walk you through everything you need to know to get started with the Googlebook, from understanding its core features to setting it up for maximum productivity. Let's dive in.

What You Need
- A Google account (required for sign-in and sync)
- An existing Android device (for cross-device features; optional but recommended)
- Wi-Fi or mobile hotspot for initial setup and updates
- Data backup from your current Chromebook or laptop (if migrating)
- Google Photos or Drive accounts for transferring files (optional)
- Patience while you adjust to the new Android-based interface
Step-by-Step Guide
Step 1: Understand What Makes Googlebook Different
Before you can use your Googlebook effectively, it's important to know what sets it apart from a Chromebook. First, it runs on Android (not Chrome OS), which means it supports millions of Android apps natively—no more relying on ARC Welder or running Android apps in a window. Second, the platform is designed for Gemini Intelligence, Google's suite of AI features that can help you write, plan, summarize, and more directly on your laptop. Third, the Glowbar is a physical light strip on the device that changes color or pattern based on notifications, battery status, or active app. Think of it as a contextual notification light. Knowing these core differences will help you appreciate the new capabilities as you set up.
Step 2: Prepare Your Data for Migration
If you're coming from a Chromebook (or any other laptop), start by backing up important files. Since Googlebook relies on Android, your files will live in Google Drive or on the internal storage. You can also sync your Chrome bookmarks, passwords, and settings by signing into your Google account. Make sure your Chromebook is fully synced via Chrome's sync settings. For photos and videos, ensure they're backed up to Google Photos. This step ensures a smooth transition with no data loss.
Step 3: Initial Setup of Your Googlebook
When you first power on your Googlebook, you'll be greeted with the standard Android setup wizard. Connect to Wi-Fi, sign in with your Google account, and choose your language. You'll be asked to enable Gemini during setup—accept to unlock AI features later. The setup will also prompt you to calibrate the Glowbar. Simply follow on-screen instructions: the Glowbar will flash different colors, and you'll confirm you see them correctly. This ensures the light reacts properly to your activities.
Step 4: Connect Your Android Devices
The native integration is one of the Googlebook's biggest strengths. Under Settings > Connected devices, you can pair your Android phone or tablet. Use the Phone Link feature (similar to Windows' Phone Link but built into Android). Once paired, you can view notifications, reply to messages, share files, and even hand off tasks between devices. For instance, start a note on your phone and finish it on your Googlebook. The Glowbar will pulse when a notification arrives from your phone.
Step 5: Explore Gemini Intelligence
Now it's time to explore the AI power. Open the Gemini app (pre-installed) or invoke it via a keyboard shortcut (e.g., Search + G). You can ask Gemini to draft emails, create summaries, plan itineraries, or generate code. Because it's deeply integrated into Android, Gemini can access your apps and data to give contextual help. For example, highlight a paragraph in a document and say “Summarize this.” The Glowbar may glow blue to indicate AI is working. Practice these interactions to get comfortable.
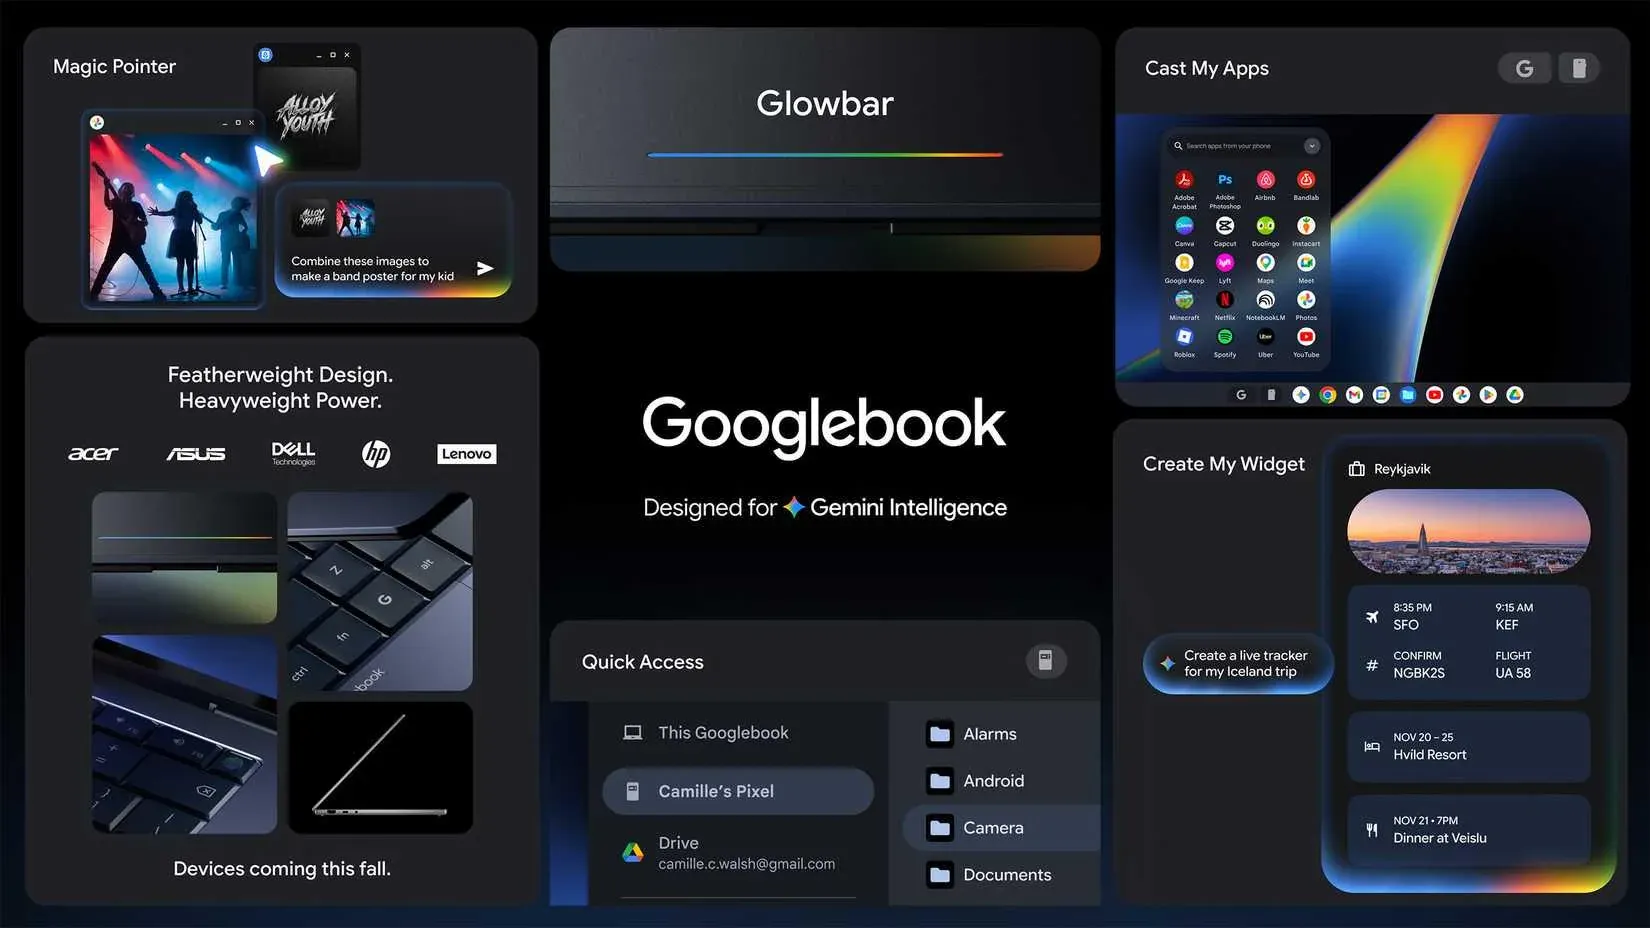
Source: www.tomshardware.com Step 6: Customize the Glowbar
The Glowbar is more than a pretty light; it can be fully customized. Go to Settings > Display > Glowbar. Here you can set different behaviors for notifications, charging, media playback, and app alerts. You can choose colors for specific contacts (e.g., green for your partner, red for urgent emails). You can also set it to pulse gently when music is playing or to flash when the battery is low. Spend time tweaking these settings to make the Glowbar genuinely useful.
Step 7: Optimize Your Workflow with Android Apps
Now that everything is set up, take advantage of the vast Android app store. You can run productivity apps like Microsoft Office, Adobe Lightroom, or Slack side by side in split-screen mode. Because the Googlebook is designed for Gemini, you might also find specialized apps that use AI for tasks like transcription or image editing. Use the Glowbar as a productivity cue: set it to turn green when you're in a focus mode (Do Not Disturb) or orange when you're on a call. Over time, you'll develop a rhythm that blends hardware and software seamlessly.
Tips for Success
- Keep Gemini enabled. The AI features are the key differentiator. Even if you don't use them daily, having them available can save you time on repetitive tasks.
- Use the Glowbar for at-a-glance info. Resist the urge to disable it immediately. A quick color change can tell you if you have a notification without unlocking the laptop.
- Sync your Android phone early. The cross-device integration becomes more natural the more you use it. Enable clipboard sharing and call forwarding if available.
- Back up regularly. Since Googlebook runs Android, you can use Google One backup to keep your settings and data safe.
- Explore Gemini's voice commands. “Hey Google” works everywhere, and you can use it to open apps, control the Glowbar, or search your files.
- Adapt your keyboard shortcuts. Many Android shortcuts carry over—Ctrl+Z for undo, Ctrl+S for save. But Gemini may introduce new ones like Search+G for Gemini or Search+L for Glowbar toggle.
- Join the Googlebook community. As the platform is new, online forums and Reddit communities will offer tips and hacks for advanced users.